
As a flooring installer who wants to go above and beyond the call of duty, you’re committed to installing a flawless floor. The last thing you want is a client calling you with complaints of damage weeks or months later.
Sufficient subfloor prep minimizes that risk. If you’ve ever been to a flooring trade show and watched some of the best installers in the nation compete, you’ve probably noticed the care they put into making sure the subfloor is perfect before they start the part of the job that most people would be focused on.
Preparation is a huge part of what separates the true professional from the fly-by-night installer.
The goal with subfloor prep is to have a clean, flat, damage-free, and dry subfloor before you install a floor covering. Moisture issues are especially common problems to show up post-installation, but proper testing can keep them from becoming part of your story. And you’ll keep your clients from experiencing those issues later on.
The more prepared the subfloor, the smoother the installation process for you!
So, let’s walk through some basic steps for preparing your subfloor, whether concrete or wood. Keep in mind any building codes or specific guidelines provided by the floor covering manufacturer, too.
1. Initial Inspection
Before doing any work, assess the existing subfloor. Does it fit the floor covering manufacturer’s requirements for a certain type of material or thickness?
Then, look for any defects.
Rot, loose fasteners, termite damage, sagging, or cracks are all indicators of deeper structural issues. There could even be problems with the foundation or joists.
Salt deposits, or efflorescence, are often evidence of moisture in the subfloor that hasn’t had enough time to dry—or a bigger underlying issue (such as a leak).
Lastly, use a level or straight edge to check for any unevenness. Doing so will help you know whether you may have to do some leveling (actually flattening) later on in the process.
2. Structural Repairs
If you find any structural issues in your inspection, make the necessary repairs, such as tightening loose fasteners (or hammering them down), making sure there are no protruding edges if it’s a wood subfloor, replacing damaged sections, or filling cracks and gaps.
3. Moisture Measurement
Since moisture can wreak havoc on a floor covering, you don’t want to have excess moisture in the subfloor that could creep into the floor above. That’s why we highly recommend testing for moisture.
First, make sure that the installation environment is at a stable temperature and humidity level. Otherwise, these ambient conditions can affect both wood and concrete subfloors, causing the moisture levels to fluctuate.
Then, you’re ready to test for moisture.
Use a wood moisture meter to check that the subfloor is within 2–4% moisture content of the flooring material. Photo: Wagner Meters.
If you’re working with a wood subfloor, use a wood moisture meter to check that the subfloor is within 2–4% moisture content of the flooring material, per the National Wood Flooring Association (NWFA). For this job, a pinless moisture meter will allow you to quickly scan the 20 locations per 1,000 square feet of flooring (also required by the NWFA).
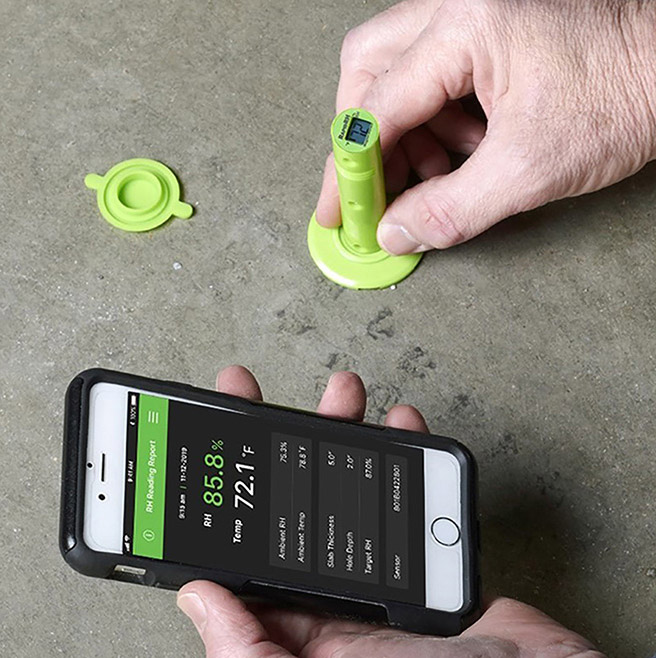
The only way to know for certain that the concrete slab is dry enough is to conduct a relative humidity test and take moisture readings deep within the concrete. Photo: Wagner Meters.
The ideal option for a concrete subfloor is relative humidity (RH) testing, in which you drill into the slab at 40% depth. Going this deep into the slab gives you an accurate picture of how much moisture will rise to the surface over time.
The standard for RH testing, ASTM F2170, requires the subfloor to be under 75% RH, though you’ll ultimately follow what the floor covering manufacturer requires.
Some manufacturers also allow the use of surface concrete moisture meters for this purpose, though they aren’t permitted by ASTM standards. If RH testing isn’t a feasible option for your business, you may want to consider an accurate concrete moisture meter, as long as it’s allowed by the manufacturer and its warranty.
4. Leveling
Having a flat floor will help prevent the floor covering from cracking or warping after installation.
Installers use three main techniques for leveling. The most labor-intensive techniques are sanding and grinding the high spots and shimming, which involves putting down thin pieces of plywood to level the surface.
The third method is putting a self-leveling compound on the subfloor (usually if you’re working with a concrete subfloor).
With this method, you’ll have to work fast since you only have about 20-30 minutes to get the compound smoothed out on the subfloor from the time you mix it. If you decide on this last method, be sure you have everything else prepared beforehand.
5. Cleaning
Once you’ve finished repairs and any sanding or grinding, use a vacuum or broom to get rid of debris and dust. Also, clean off any old adhesives, paint, or coatings—really anything that could prevent bonding (if you’re doing a glue-down floor). A damp mop and some mild cleaning solution can be helpful for doing that.
Pro Tip: If you’re using a self-leveling compound, cleaning should happen before applying it on the floor.
Don’t Let Poor Subfloor Prep Harm Your Work
Flawless flooring is the goal, and proper subfloor prep is a big step in the right direction, especially when it comes to moisture, which can so easily harm your hard work.
Whether you’re working with a wood floor or a concrete slab, make sure you have the tools and tests you need for prepping the subfloor and giving your clients the floor they deserve.
See more articles from our July 2024 issue!